The Creality Ender 3 Pro is a popular and affordable FDM (fused deposition modeling, also called fused filament fabrication, or FFF) 3D printer that has gained a strong following among hobbyists and makers. Known for its reliability, ease of use, and upgrade-ability, the Ender 3 Pro is a great choice for both beginners and experienced users.
My best man gifted my wife and me (mostly me) an Ender 3 Pro for our wedding. So far, most of the printing I've done has only served to improve the printer... I've made several upgrades and modifications to enhance its performance and usability.
Upgrades
Extruder
One thing almost every Ender owner will end up doing is replacing the stock, plastic extruder mechanism with a more robust aluminum model (such as this ). A design flaw with the original often leads to the plastic snapping with some continuous usage— causing under-extrusion or preventing filament from traveling through the Bowden tube altogether.
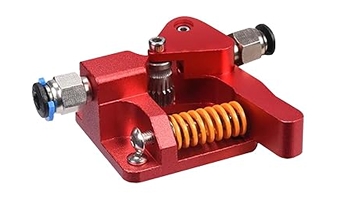
This was one of the first upgrades I made to the printer, and it significantly improved print reliability.
Printable Upgrades
There are many printable upgrades available for the Ender 3 Pro that can enhance its performance and usability. Some of the additions I've found particularly useful:
-
Cable Chains
Cable chains help manage and protect the printer's wiring— reducing wear and tear, and keeping wires organized during operation. -
Filament Guides
A filament guide helps ensure smooth feeding of the filament into the extruder, reducing the risk of jams and tangles. -
Spool Holder
An upgraded spool holder with smooth bearings can accommodate larger spools and provide better support, reducing strain on the filament during printing. -
Camera Mount
A camera mount allows for easy installation of a webcam or Raspberry Pi camera module, enabling remote monitoring and time-lapse recording of prints.
Control Software
Klipper Firmware
One of the most significant upgrades I've made to my Ender 3 Pro is installing Klipper firmware . Klipper is an open-source firmware that runs on a host computer (like a Raspberry Pi) and communicates with the printer's microcontroller (MCU).
This offers several advantages over traditional firmware, including:
- Improved print quality and speed
- Advanced features like pressure advance and input shaping
- Easier configuration and updates via a web interface
- Support for multiple MCUs and complex printer setups
To install Klipper, I followed the official installation guide
. I used the printer.cfg
specific to my model after opening the controller enclosure and inspecting the MCU on the printer's mainboard. My model uses the STM32F103 chip with a v4.2.2 controller.
You'll need to format a microSD card with the Klipper firmware binary and insert it into the printer's mainboard. When you power on the printer, it will flash the new firmware automatically. You can then remove the microSD card and finish the host software setup on your Raspberry Pi.
Calibrate Hotend PID
I noticed a recurring verify_heater error that was causing an mcu connection error. After some digging, I found that Klipper offers several GCODE scripts for PID calibration.
To calibrate the hotend PID, I ran the following command in the terminal with my most common filament temperature (208°C, for PLA):
PID_CALIBRATE HEATER=extruder TARGET=208Once the calibration process was complete, I then ran SAVE_CONFIG to save the new PID values to the printer.cfg file. This resolved the verify_heater errors for a while, and improved temperature stability during prints. The same calibration process can be run on the heated bed by replacing extruder with heater_bed and adjusting the target temperature (60-70°C) accordingly.
MCU Connection Errors
Once in a while, I'd see prints suddenly halting with an mcu connection error in Klipper. Sometimes this would happen near the start of a print, other times it would happen hours into a print. This can be awful when you've lost hours of print time and material for nothing.
Why does this happen? How can you fix it?
- Skip using a Wi-Fi enabled outlet
I like the convenience of turning on my printer from the couch, but from my experience these outlets can be flaky. Plug directly into an outlet, or check that the switch has a good amp-rating that can provide stable power to the printer. - Use a good USB cable
I've had a cable-swap suddenly fix thismcuerror issue— then randomly gotten it again after a few months. After the first two cables, I ended up switching to a shielded cable with a ferrite choke. Honestly— I think this was the biggest help in resolving these errors. - Powering other heavy devices
Make sure you're not powering other power-hungry devices on the same circuit or power-strip.
Mainsail
I'm using Mainsail as the Klipper web interface for managing the printer. It's virtually the same as Fluidd — another popular Klipper web interface.
Mainsail provides a very lightweight web interface for Klipper that makes printer control and monitoring simple and straightforward. It's also mobile-responsive, so I can check prints and manipulate the printer from my smartphone. It offers features like:
- Real-time temperature monitoring
- Motor control
- Print job management
- G-code viewer
- System status and logs
- Camera integration with the Crowsnest plugin
OctoPrint
OctoPrint is another popular web interface for 3D printers, and it's what I used before flashing the Klipper firmware. Mainsail is specifically designed for Klipper and offers a more streamlined experience. However, OctoPrint will also work with Klipper, and it provides similar functionality to Mainsail.
OctoPi
One of my favorite ways to run OctoPrint is using OctoPi , a pre-configured Raspberry Pi image that includes OctoPrint and all necessary dependencies. This makes it easy to set up a dedicated print server for the Ender 3 Pro— letting you manage prints remotely and monitor the printer in the browser over Wi-Fi.
Tips and Tricks
Here are a few tips and tricks I've learned while using the Ender 3 Pro:
-
Bed Leveling
Regularly check and adjust the bed leveling to ensure optimal print adhesion and quality. I use a piece of paper to gauge the distance between the nozzle and the bed at various points. The paper should just barely slide with slight resistance. -
Nozzle Cleaning
Keep the nozzle clean to prevent clogs and ensure consistent extrusion. I use a brass wire brush to gently clean the nozzle after prints, and occasionally perform a cold pull to remove any residual filament. Stock up on additional nozzles for when you get a clog that can't be easily resolved. -
Smart Plug
I use a smart plug to control the power to my Ender 3 Pro remotely. This allows me to turn the printer on and off from my phone and schedule print jobs without needing to be physically next to the printer. -
Timelapse
If you're using a camera with Mainsail, you can set up timelapse recordings of your prints. This is a great way to document your printing process and share your creations with others. Follow instructions to clone the moonraker-timelapse repo and build the plugin. You'll need to add the following lines to yourmoonraker.conffile:
[timelapse]
output_path: ~/printer_data/timelapse/
frame_path: /tmp/timelapse/printer
You can also allow the Moonraker update manager to handle updates for the timelapse plugin by adding this section to your moonraker.conf:
[update_manager timelapse]
type: git_repo
primary_branch: main
path: ~/moonraker-timelapse
origin: https://github.com/mainsail-crew/moonraker-timelapse.git
managed_services: klipper moonraker
Micro SD Backup
If your Klipper host (I'm using a Raspberry Pi) fails to finish the boot sequence— revealing the dreaded blinking cursor/black screen of death instead of starting up the Moonsail/Fluidd interface— you might have a corrupt SD card. Every Raspberry Pi enthusiast has faced the awful reality of a bad micro SD card. It's a legitimate problem that can destroy your morale and make 3D printing much less fun.
Instead of repeatedly flashing Raspberry Pi OS, you can mitigate this risk by periodically backing up the contents to another storage device. I have a 32GB card in the Pi, so I used another 32GB card to create an identical copy using balenaEtcher . In this way, if the primary card fails, I can quickly swap in the other card and get back to printing.
Insert the source card into your computer, launch balenaEtcher, and select "Clone Drive" from the main menu. You can tell which is which by plugging both in then unplugging one and clocking which disappeared from the clone menu. You'll need to first format the backup as FAT32 before cloning. Choose the source and target, then start the cloning process. Once complete, label the backup card with the date so you know when it was created.
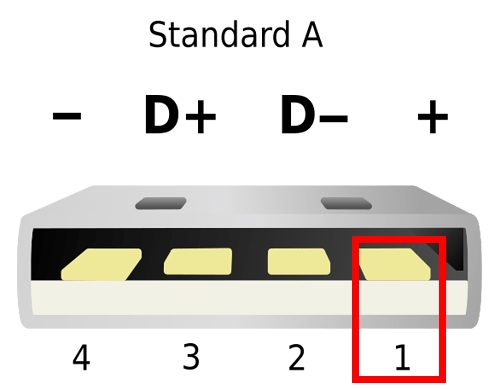
Raspberry Pi USB Power Trick
If you're using a Raspberry Pi with Klipper or OctoPrint to control your Ender 3, you might notice that the USB connection can power the Ender's TFT screen— even when the main printer PSU is shut off.
To avoid this, I took a small strip of painter's tape and covered the 5V pin (the rightmost pin when looking straight into the male USB plug). This prevents back-powering the printer's screen when the Pi is powered on independently which could potentially cause screen damage over time.