Microsoft 💔 Linux
In 2001, Microsoft's former CEO— Steve Ballmer— was quoted by the online tech news publication, The Register, saying:
Linux is a cancer that attaches itself in an intellectual property sense to everything it touches
Fast-forward 15 years into the future— at Microsoft's developer conference, Build 2016— and Gates' tech behemoth reveals a sudden volte-face. The current CEO, Satya Nadella, announces Windows Subsystem for Linux. With WSL, Microsoft is taking some of the most popular Linux distributions and making them available within Windows through the Microsoft Store.
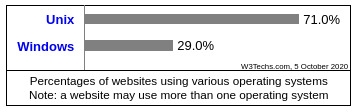
According to a W3Techs survey , Unix operating systems (the under-pinning OS of Linux, as well as macOS) make up 71% of the Web, the remaining 29% being Windows. Additionally, every Android phone, tablet and smart TV runs on a modified version of the Linux kernel. So, I guess if you can't beat 'em, join 'em?
Whether or not its because of Microsoft's good graces or some ulterior motive, I know having an easily accessible Unix-type environment available on Windows has been a godsend for me and for so many other developers.
What's so great about WSL?
Before WSL, developers running Windows had two options:
- A virtual machine (VM)
- Dual-booted operating systems
Running a virtual machine uses up more resources than WSL. It can also be difficult to integrate hardware and files between the host machine and the VM. Dual-booting allows for a full-fledged install on a separate disk partition; but it requires a restart any time you want to switch between OS's.
Windows Subsystem on Linux doesn't integrate with the host's hardware perfectly— for example, NVIDIA is still working on CUDA drivers that will take advantage of GPU resources from within WSL. However, for Linux developers who are frequently running CAD software or Adobe Suite (which are difficult-to-impossible to install on Linux), WSL can be a fantastic partner.
WSL1 vs WSL2
More recently, Microsoft announced WSL2— an update that allows for a more complete Linux kernel to run on a Windows machine. This made it much easier to install a variety of software that had been difficult to run on the previous, WSL1. WSL2 is very similar to running a virtual machine (in fact it uses Microsoft's hyperV virtual machines).
However, using WSL2 (as opposed to installing a Linux distro through VirtualBox, or another VM manager) provides some minor performance benefits since Microsoft has optimized it to integrate with Windows' services. If you want, I recommend reading Microsoft's own WSL1-vs-WSL2 feature comparison docs.
Alright, so how do I install WSL2?
Microsoft has clean, straight-forward installation documentation for WSL and WSL2. You can refer to that tutorial if you get stuck, or just follow the steps outlined below. Before starting, make sure you update your Windows 10 installation with the most recent build.
I'll also be going one-step further, and showing you how to run a Linux GUI using WSL2 and VcXsrv (display forwarding). If you're more of a visual-learner, I've also included an installation speedrun video that follows the same steps outlined below (edit: I forgot step 11 in the video, and it's a critical one! Make sure you do that!).
1. Enable WSL Feature
First you need to enable the Windows Subsystem on Linux feature by right-clicking on Powershell from the start menu and clicking "Run as Administrator".
Then, paste the following command and hit "Enter"— don't close the Powershell!
dism.exe /online /enable-feature /featurename:Microsoft-Windows-Subsystem-Linux /all /norestart2. Enable WSL2 Virtual Machine Feature
After the last command is finished, paste the following command in the same Administrator-level shell, and hit "Enter" to enable the WSL2 VM. Again, keep this shell open.
dism.exe /online /enable-feature /featurename:VirtualMachinePlatform /all /norestart3. Download and Install the WSL2 Linux Kernel Update
Click here to download the Microsoft executable for installing the WSL2 Linux Kernel update. Once it's finished downloading, double-click the executable and follow the installation steps. This part's pretty straightforward.
4. Set WSL2 as Default Version
Copy and paste the following command in Powershell to set WSL2 to be the default version:
wsl --set-default-version 25. Install Ubuntu 20.04 from the Microsoft Store
Click the start menu and open the Microsoft Store. Search for "Ubuntu 20.04" and install this Linux distro. If you want to use another distro, that's fine; but Ubuntu 20.04 is compatible with the Regolith Linux desktop GUI we'll be installing in just a bit.
6. Ubuntu 20.04 Initial Setup
Once Ubuntu is done installing, click "Launch" to initiate first-time installation setup. You'll be prompted to put in a username and password.
7. Make sure You're Using WSL2
At this point, it might be a good idea to double-check that WSL is using version 2 by default. Open a command prompt (or use Powershell if it's still open) to paste in the following command:
wsl --list --verbose8. Download and Install VcXsrv
VcXsrv is an X Server that we'll use to view the GUI from WSL2.
There are a few other display-forwarding servers available (like Xming ), but I've found VcXsrv works the best. Download the executable here and click through the installation steps.
9. Install Regolith Desktop
I have Regolith Desktop installed on one of my PCs, and it's fantastic. It's preconfigured to use the i3 window manager which I find incredibly efficient for its tiling and hotkey features.
A loosed reader, Rodrigo, asked specifically for a Regolith tutorial; but if you want to install a different GUI I'm sure its possible! To install Regolith Desktop, open your fresh Ubuntu install, and paste in the following lines:
sudo add-apt-repository ppa:regolith-linux/releasesudo apt install regolith-desktop i3xrocks-net-traffic i3xrocks-cpu-usage i3xrocks-timeIt's a lot of packages, so it'll take some time.
10. Change the "Mod" Key
Regolith, or rather i3-wm, uses the Super (Windows) key as the hotkey prefix by default. Since you're running this GUI within Windows, you'll run into a lot of overlap between Windows' and i3-wm's preconfigured shortcuts.
For this reason, I recommend swapping the Super key for the Alt key. To change the Mod key mapping use the Vim or Nano text editors to open the configuration file located at:
vim /etc/regolith/i3/configOn lines 42 and 43, you should find the Mod key assignment. Switch "Mod1" and "Mod4" and you'll be good to go! Your edited lines should look like this:
set_from_resource $mod i3-wm.mod Mod1set_from_resource $alt i3-wm.alt Mod4If you're using Vim, hit "Escape" and type ":wq", then hit "Enter" to write and quit the file. You can check out the official Regolith tutorial on making these changes if you get stuck.
11. Export DISPLAY parameter
Another critical edit (that I forgot to put in the video— oops 🙃) is to export the DISPLAY variable. Since WSL2 is a VM, it has it's own IP address (which can change at each startup). As a result, you'll need to add a couple lines to your bash profile for VcXsrv to connect to WSL2.
To open your ".bashrc" with Vim:
vim ~/.bashrcPress and hold Shift then press "G" to jump to the bottom of the file. On two new lines, paste in the following code:
export DISPLAY=$(awk '/nameserver / {print $2; exit}' /etc/resolv.conf 2>/dev/null):0
export LIBGL_ALWAYS_INDIRECT=1
12. Open and Configure VcXsrv
Click the start menu and type in "Xlaunch" then hit "Enter" to run VcXsrv. Click the "One window without titlebar" option (you can explore the others later, if you want) and click next. Leave it on "Start no client" and click next. Then, in the "Additional parameters" input, add "-ac" and click next. I recommend clicking "Save configuration" for ease of use.
At this point, you should have a black screen waiting to accept a display input.
13. Run Regolith Desktop
The last thing to do is run the magic line:
i3-gnome-flashback-sessionYou should then see a graphical Regolith Desktop appear in the VcXsrv window! Huzzah! Feel free to play around with your new graphical WSL2 setup. To see an overview of the available shortcuts, use "Alt+Shift+?" to bring up the help menu. You can find more help in Regolith's official documentation.

Wrapping Up
Hopefully you finished this tutorial with a working Regolith Desktop GUI running off WSL2. If you run into any issue, or have questions, feel free to leave a comment. If you'd like to know how to forward audio from WSL2 (a feature not yet available by default), let me know and I'll put together another tutorial.
Until next time, happy coding!

